A thorough lab contamination audit uses a facility inspection checklist, particle migration mapping, entry protocol review, and data-driven cleaning schedules to catch hygiene failures before regulators or ruined experiments do. Industry leaders apply these quantitative methods to achieve zero-defect compliance across every zone. Do this right, and you transform your facility from a liability into a competitive advantage.

Most lab managers assume their facility is clean because it looks clean. That assumption has ended careers, triggered recalls worth millions, and shut down operations that took years to build. The difference between a facility that passes an audit and one that fails often comes down to whether anyone bothered to measure what they could not see.
Creating a Facility Inspection Checklist
Your facility inspection checklist is not a formality. It is the foundation of every other audit step. Without a systematic threshold-by-threshold review, you are making assumptions about the state of your most vulnerable transition zones.
Every threshold in your facility is a contamination vector. Doors, pass-throughs, gowning areas, airlocks, and the seams where different ISO zones meet are the places where particles smuggle themselves from dirty to clean. Your checklist needs to capture all of them.
At every physical threshold, inspect the following:
- Drain covers, cable penetrations, and utility entry points for unsealed gaps
- Door seals and gaskets for visible wear, tears, or compression failure
- Differential pressure readings between adjacent zones (target: 10-15 Pascals between ISO classes, per ISO 14644-4)
- HEPA filter frame integrity; look specifically for rust, gaps, or particle board infill (a deficiency cited in multiple FDA 483 observations)
- Surface finish condition: chipping paint, exposed porous material, or ceiling gaps that trap particles
- Lighting intensity: shadows hide early-stage buildup on ledges and corners
Threshold Classification and Risk Scoring
Not every threshold is equal. A door between an ISO 7 corridor and an ISO 5 filling suite carries exponentially more risk than a door between two ISO 8 prep rooms. Your checklist should assign a risk score (1-5) to each threshold based on the ISO classification differential across it.
Use a simple scoring matrix: a one-class differential scores a 1, a two-class differential scores a 3, and a three-or-more-class differential scores a 5. Any threshold scoring 4 or higher triggers a mandatory corrective action before the next production run.
Head-to-Head: Manual vs. Automated Threshold Inspection
| Factor | Manual Inspection | Automated Monitoring |
|---|---|---|
| Cost (setup) | Low | High |
| Real-time alerts | No | Yes |
| Audit trail | Paper-based | Digital, timestamped |
| Human error risk | High | Low |
| FDA/ISO compliance value | Moderate | High |
| Recommended for ISO class | ISO 7-9 | ISO 5-6 |
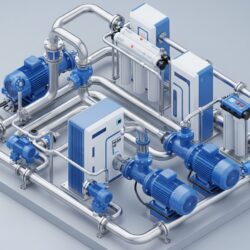
For most facilities, a hybrid model works best: manual threshold checklists for lower-risk zones, continuous electronic monitoring for ISO 5 and ISO 6 critical areas. You can read more about building the right water and process infrastructure to support these zones in Purific’s 4-step laboratory solutions process.
Filling out this checklist once is meaningless. Filing it, trending it over time, and acting on it are what separate labs that pass audits from labs that fail them. Speaking of acting on data, the next issue most labs ignore is what happens after the threshold is breached.
Tracking Particle Migration
Particles do not respect the lines on your floor plan. They hitch rides on lab coats, float through door drafts, and settle on benches where your most sensitive work happens. Tracking their movement is not optional if you want a defensible contamination audit.
The standard method is airborne particle counter mapping, using portable laser counters to sample multiple locations during both at-rest and operational conditions. ISO 14644-1 requires this distinction because operational particle counts can be dramatically higher than at-rest readings due to personnel activity. A technician standing still in an ISO 6 room sheds approximately 100,000 particles per minute. Movement multiplies that figure.
Building a Particle Migration Map
To build a useful migration map, you need at minimum three measurement points per room: one near the primary air supply, one in the center work zone, and one near the exhaust or return. Add measurement points at every threshold connecting to a higher-contamination zone.
Steps to generate your migration map:
- Pressure verification: confirm differential pressure is maintained at 10-15 Pa between every adjacent ISO zone pair
- Baseline measurement: sample all rooms at-rest with no personnel, no equipment running
- Operational measurement: repeat with normal staffing and processes active
- Differential analysis: calculate the particle count delta between at-rest and operational at each point
- Migration vector identification: trace high-delta zones back to their likely source (entry points, high-activity work areas, HVAC supply/return imbalances)
Interpreting Migration Data Against ISO 14644 Limits
For ISO 7 environments (the most common lab classification), the maximum allowable concentration for particles 0.5 microns and larger is 352,000 per cubic meter. If your operational samples approach or exceed this threshold in zones that were compliant at-rest, you have a migration problem, not just a cleanliness problem.
Document your migration vectors in a site map and attach them to your audit report. Regulators and quality teams want to see not just what you measured, but how the numbers connect to specific risks in your facility layout.
Your migration map tells you where particles are traveling. Your entry protocol audit tells you who is bringing them there.
Conducting an Entry Protocol Audit
Entry protocols are the first line of defense in any contamination control system. They are also among the most consistently violated procedures in any lab that has operated for more than a year. Compliance drifts. Habits form. Shortcuts get normalized.
An entry protocol audit measures actual compliance against your documented SOPs, not assumed compliance. There is a significant difference.
What to audit in every decontamination zone:
- Material transfer controls: are items entering through validated pass-throughs, or being hand-carried through personnel doors?
- Gowning sequence compliance: are staff donning garments in the correct ISO 14644-specified order?
- Sticky mat usage: are personnel making full, deliberate contact, or stepping partially across?
- Hand hygiene: is sanitization happening before gloving, or are staff skipping the step?
- Air shower dwell time: is the minimum cycle time being observed, or are doors being forced open early?
Measuring Compliance Rates with Direct Observation
The most accurate compliance data comes from direct observation, not self-reporting. Assign a trained auditor to observe a minimum of 20 consecutive entry events per shift at each gowning room. Score each event against your SOP checklist. Calculate a compliance rate as a percentage.
A compliance rate below 90% on any single step is a significant finding. Below 75% is a critical finding requiring immediate corrective action and retraining. Industry data consistently shows that personnel are the dominant source of contamination in operational cleanrooms, making this audit step one of the highest-ROI activities in your entire contamination control program.
Once you know who is bringing contamination in and how, the next question is what is happening to the floors beneath their feet.
Benchmarking Floor Hygiene Standards
Floors are the most contaminated surfaces in any laboratory environment. Gravity is relentless, and every particle that enters your facility eventually lands somewhere underfoot. Defining what “clean” actually means for your high-traffic areas requires quantitative benchmarks, not visual inspection.
Visual inspection is subjective and unreliable. A floor that looks clean to the eye can carry surface particle loads several orders of magnitude above your target thresholds. You need numbers.
Surface Cleanliness Standards by Zone Type
ISO 14644-9 provides classification for surface cleanliness by particle concentration. Use these benchmarks to define pass/fail criteria for each zone in your facility:
- Gowning room floors (ISO 8 equivalent): target surface particle density below 1,000 particles per cm2 for particles 5 microns and larger; swab or contact plate sample to verify
- Corridor and transition zone floors: visual plus particle counter at 30 cm above floor level; counts should not exceed ISO 8 limits (3,520,000 per m3 at 0.5 microns)
- Cleanroom floors (ISO 5-7): contact plate microbial sampling per each production shift; tactile mat effectiveness verified by upstream and downstream particle counts
- High-traffic entry floors: sticky/tacky mat effectiveness measured by comparing particle counts on the mat surface versus the floor surface immediately past the mat
Minimum floor hygiene monitoring frequency by zone:
- ISO 5 critical areas: after every shift
- ISO 6-7 production areas: daily
- ISO 8 support areas: weekly
- Gowning and transition zones: daily
For labs with high-purity water systems, floor contamination around distribution loops and purification equipment requires special attention. Purific’s water distribution loop design guide covers how equipment placement affects contamination risk at the floor level.
A floor that passes its benchmark today may fail it tomorrow if the cleaning schedule is not calibrated to actual traffic and activity data. That calibration is the subject of the next section.
Validating Cleanroom Maintenance Schedules
Most cleanroom maintenance schedules were written when the facility opened and have not been meaningfully revised since. If your cleaning frequency is based on tradition rather than particle count data, you are either over-cleaning (wasting resources and introducing chemical residues) or under-cleaning (accumulating contamination between cycles).
Validating your schedule means comparing your cleaning frequency to your particle count trends. Data drives the frequency.
Data-Driven Schedule Adjustment Protocol
Per ISO 14644-2 requirements, full requalification of your cleanroom classification must occur at minimum annually, with continuous or periodic monitoring running between certification events. Use this monitoring data to calibrate your cleaning schedule:
- Step 1. Pull particle count trending data for the 30 days prior to each scheduled cleaning event.
- Step 2. Identify the average particle count at 24 hours, 48 hours, and 72 hours post-cleaning.
- Step 3. Plot the recovery curve: how quickly do counts rise from post-cleaning baseline to within 20% of the action level?
- Step 4. Set cleaning frequency so that the interval never allows counts to reach 80% of the action level between events.
- Step 5. Document the revised schedule and the data justification in your quality management system.
UV Lamp and HEPA Filter Validation Within the Schedule
Two maintenance items consistently fall out of sync with actual performance: UV lamps and HEPA filters. UV lamp output degrades over time without any visual indication. HEPA filter efficiency drops as filter media loads with particles. Both failures are invisible and both produce rising particle counts that get incorrectly attributed to other causes.
UV lamp output should be measured with a calibrated radiometer and logged, not assumed based on a replacement calendar. Purific’s UV lamp maintenance guide for labs provides a practical framework for integrating lamp performance checks into your maintenance validation process.
A validated, data-driven schedule does more than keep your facility compliant. It generates the documentation that directly supports the ROI calculation we cover next.
Calculating Contamination Control ROI
Contamination control is often treated as a cost center. The data says otherwise. When you factor in the true cost of contamination events, a rigorous audit and prevention program is one of the highest-return investments a lab facility can make.
Start with the cost of failure. Equipment downtime from contamination events carries a steep price tag. A 2024 Siemens analysis found that unplanned downtime across top industrial operations costs over $1.4 trillion annually, and contamination is among the leading causes in controlled-environment manufacturing. For pharmaceutical and semiconductor facilities specifically, a single contamination excursion can halt production for days to weeks while investigation, remediation, and revalidation occur.
Building Your Contamination Control ROI Model
Use this framework to quantify the value of your audit program:
Direct cost avoidance (annual):
- Average cost per contamination event (include investigation labor, downtime, materials scrapped, and revalidation): estimate conservatively at $15,000-$50,000 per event depending on facility class
- Frequency reduction achieved by audit program: if your baseline is 6 events per year and the program reduces it to 1, you are avoiding 5 events worth of cost
- Equipment lifespan extension: facilities with validated cleaning schedules report fewer instrument failures attributable to particulate ingress; estimate 10-15% reduction in maintenance costs for sensitive analytical equipment
Indirect value:
- Regulatory inspection readiness: continuous monitoring data and documented audit trails reduce the cost and anxiety of FDA, ISO, or internal audits
- Reputation protection: a single publicized contamination recall can cost multiples of your annual prevention budget
- Staff time recaptured: a validated schedule eliminates reactive deep-cleans triggered by failed particle counts, freeing labor for productive work
A simplified ROI formula:
ROI (%) = ((Cost of Contamination Events Avoided + Equipment Savings) – Annual Audit Program Cost) / Annual Audit Program Cost x 100
For most ISO 6-8 facilities, a comprehensive audit program running $20,000-$40,000 annually in labor and monitoring costs will avoid contamination losses that are 3-5 times that figure. That is a 200-400% ROI before the regulatory and reputational benefits are counted.
The global cleanroom and lab surface contamination control products market reflects this logic. It is projected to grow from $1.056 billion in 2025 to $1.519 billion by 2035, driven by exactly the kind of data-driven investment described here. Labs that quantify the return are the ones funding the investment. Labs that do not are the ones funding the failures.